Strain gauges are small sheets of flexible, electrically-insulating backing material that hold thin sheets of metal foil cut into a pattern. Engineers glue them to the surface of the material under test. As the surface of the material deforms (stretches or contracts), so does the strain gauge. Because most strain gauges are very thin, usually a few microns, they do not affect the test measurement.
These small and valuable measurement devices need care and attention to be taken when assembling them in order to maintain their proper functionality. Therefore, before assembling the strain gauge, ensure you have a clean work area and place all needed assembly equipment within reaching distance.
- First put a reasonable amount of M-PREP conditioner onto the substrate (object you are attaching the strain gauge too) and using silicon carbide paper clean the area. This process makes sure the glue will stick to the substrate and strain gauge properly and it takes away all the dirt on the substrate.
- Clean off the conditioner using gauze and wipe from the inside out. By doing this outwards motion you are not bringing any dirt back in, because if you let the liquid dry it shrinks into the middle and pulls all the dirt into the centre of the substrate. Equally with the neutraliser, which is the next step, if you do not dry off the liquid as it is evaporating it draws the dirt back to the middle of the substrate.
- Put a reasonable amount of M-PREP neutraliser onto the substrate (otherwise, the strain gauge will not stick). Take your cotton wool swabs and thoroughly clean the substrate. It has had acid on it and if this is not cleaned off the strain gauge will peel off.
- Wipe the neutraliser off with new gauze in an outwards motion.
- The substrate is now conditioned and prepped.
- Follow the same cleaning process with the neutraliser on the glass plate, and then wipe outwards any excess liquid, leaving the plate dry. We use a glass plate, as this is the easiest thing to keep clean when assembling strain gauges. The plate is used to first assemble the strain gauge before being glued to the substrate.
- On the glass plate, lift and place the solder tag using the tweezers, make sure you do not touch the solder tag when you take it out of the protective packaging.
- Again, using tweezers carefully remove the strain gauge from the protective packaging and place this on top of the solder tag. The tag needs to be below to attach the wires on top when it is placed on the substrate and it stops any accidental pulling on the gauge legs, it pulls at the tag first before anything else.
- Add Mylar tape on top of the strain gauge making sure the tape is flattened against it and then cut the excess tape with the scalpel. Hold the tape at a shallow angle, so you do not put creases into the strain gauge and place this onto the substrate. Make sure you do not touch the strain gauge, just the tape.
- Using the tape at a shallow angle again, pull this backwards until the strain gauge is slightly off the substrate.
- Using the glue, but do not touch anything, just let the glue drip onto the substrate. Anything that touches the strain gauge will contaminate it.
- Holding the substrate up, move the tape slightly in a slow motion, to make sure the glue covers all of the strain gauge.
- With clean gauze along with the tape, use this to help you slowly place the strain gauge back down onto the substrate. Hold this down with your finger for around one minute; the heat will mould the glue and strain gauge together.
- Pulling the tape straight back on itself slowly, remove the tape until you get to the strain gauge legs, then using a scalpel cut the legs off. Remove the rest of the tape.
- Cut a small piece of soft adhesive tape or masking tape, which is used to protect the gauge whilst soldering, and place this over the strain gauge.
- Get the soldering iron and solder the gauge legs to the solder tag.
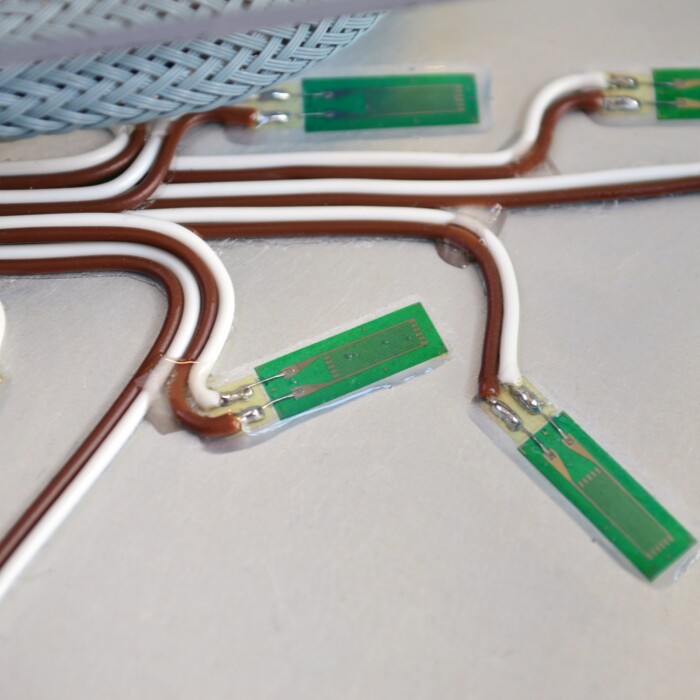
- Now the strain gauge is down on the substrate we can test the resistance. This is a 350 OM gauge so the readings should resemble this.
- Now to add the wires. Strip the wire then add a small amount of solder to the ends.
- Then attach the wires to the strain gauge using the solder iron and the solder already put onto the gauge. The strain gauge is now finished but will need cleaning up.
- With Rosin Solvent, clean off the flux glue and paper, if you do not clean off the flux you might get skewed readings, because flux will conduct if any residue remains, and if you try and remove the paper another way it could pull the insides of the gauge out.
- Using a toothpick place the Epoxy glue over the tip of the wires. This holds the wires down in case anyone accidentally pulls anything.
- Wait a minute for the glue to dry then place silicon over the entire strain gauge, spreading it evenly with a clean toothpick, again try not to touch the gauge with either the silicon tube or the toothpick. Then clean the edges with a cotton bud and leave to dry.
- Here is the finished strain gauge.
We hope you found this useful.